YOUR email
If you have your own domain name then you should use the email account(s) associated with that domain. There are a number of email programmes available, and set up instructions the four most common ones are below (click on the red bar of your choice).
Please note that the specifics of the email programme that you use on your pc, tablet or telephone may well be slightly different from the instructions below.
Outlook Express
Different versions of Outlook Express have slightly different set ups. This should give you a pretty good idea of where to go and what to do though.
Go to TOOLS and select EMAIL/INTERNET ACCOUNTS.
Enter your name, as you want it to appear in any messages you send.
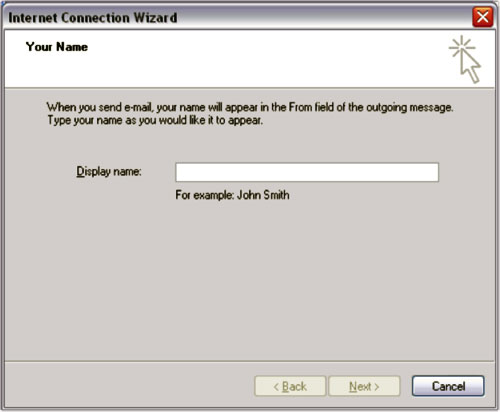
Click Next.
Enter your email address and password.
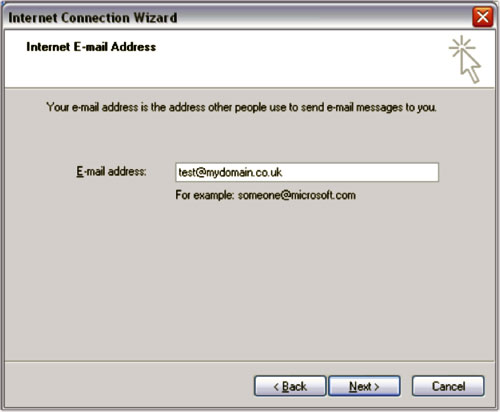
Click Next.
Select POP3 and enter the incoming mail and outgoing mail settings you have been given for your account.
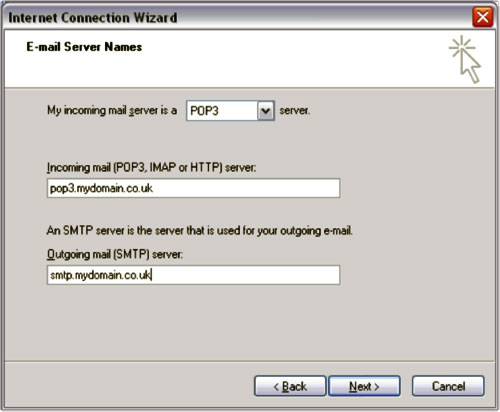
Click Next.
Enter your password.
Unless you are on a shared computer (and are very good at remembering your passwords) click on Remember password.
Deselect the secure password setting at the bottom of the page. This is set as a default but is not needed.
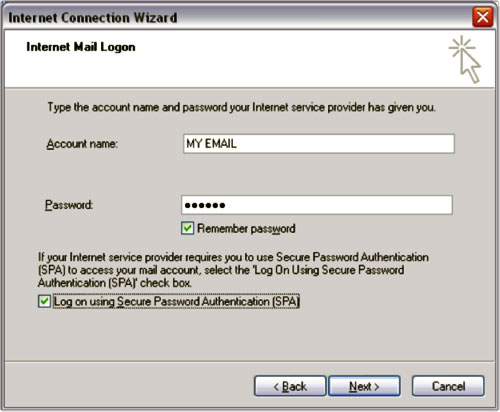
Click Next and then Finish.
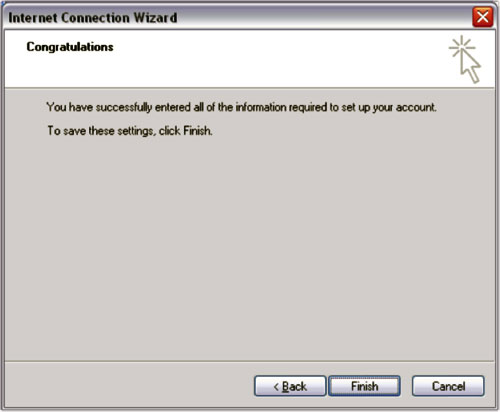
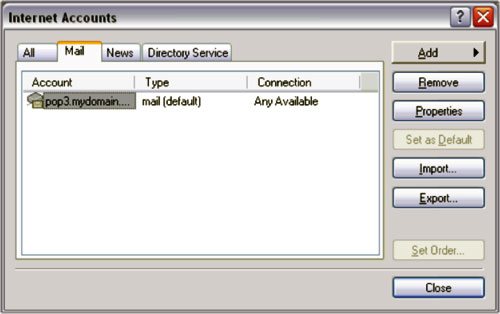
Your account should now look like this if you go to Tools/Internet Accounts and then the Mail tab.
To change the outgoing email port from 25 to 25025 if you find you have problems sending emails select your account name and click on Properties.
Click on the Advanced tab and change the port number there.
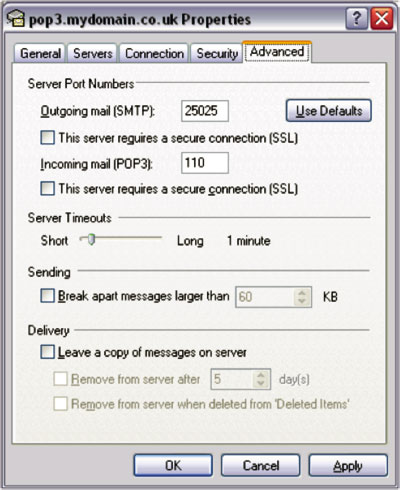
After making any changes click OK and exit the Email Accounts section.
Go to TOOLS and select EMAIL/INTERNET ACCOUNTS.
Enter your name, as you want it to appear in any messages you send.

Click Next.
Enter your email address and password.

Click Next.
Select POP3 and enter the incoming mail and outgoing mail settings you have been given for your account.

Click Next.
Enter your password.
Unless you are on a shared computer (and are very good at remembering your passwords) click on Remember password.
Deselect the secure password setting at the bottom of the page. This is set as a default but is not needed.

Click Next and then Finish.

Your account should now look like this if you go to Tools/Internet Accounts and then the Mail tab.
To change the outgoing email port from 25 to 25025 if you find you have problems sending emails select your account name and click on Properties.

Click on the Advanced tab and change the port number there.

After making any changes click OK and exit the Email Accounts section.
MS Office Outlook
Different versions of Microsoft Outlook have slightly different set ups. This should give you a pretty good idea of where to go and what to do though.
In the TOOLS menu select EMAIL ACCOUNTS and then ADD NEW ACCOUNT.
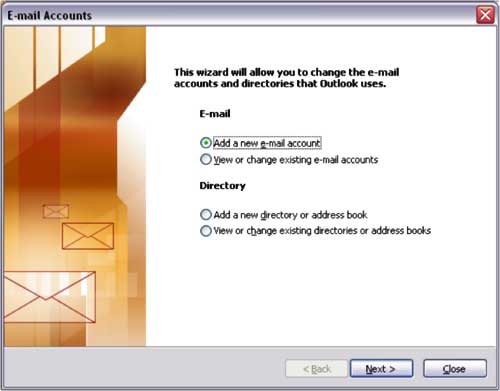
Click NEXT and select POP3 from the new window.
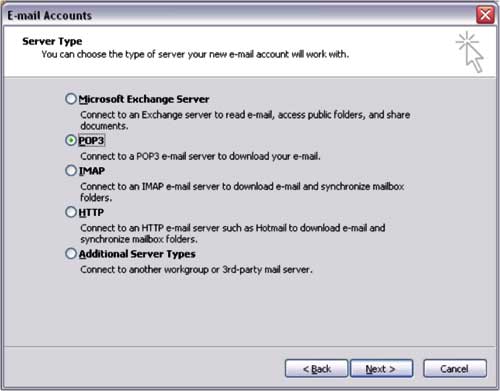
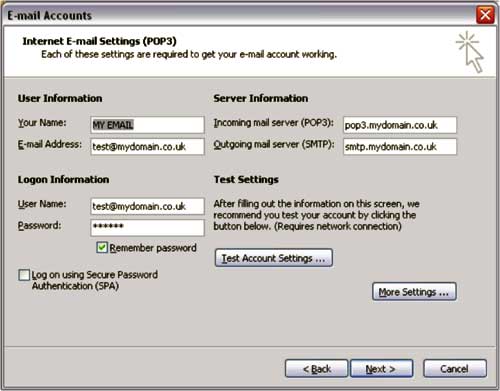
Click NEXT and then enter your POP3 and SMTP settings.
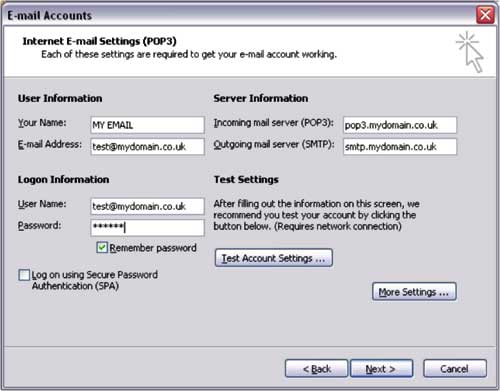
Click MORE SETTINGS and then the OUTGOING SERVER tab.
Select the authentication settings as below.
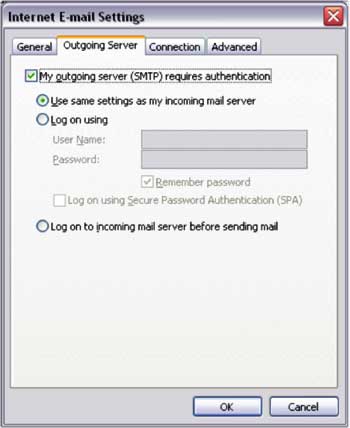
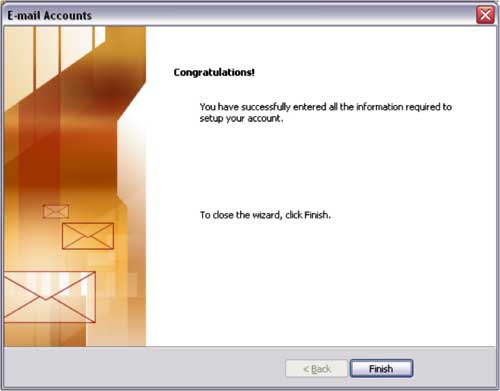
Click OK and then FINISH.
If you need to change any settings go to TOOLS/EMAIL ACCOUNTS again and select VIEW OR CHANGE.
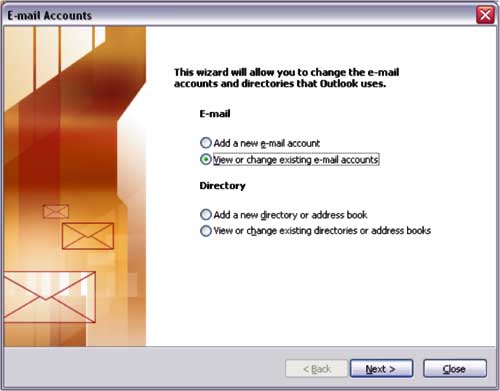
Click NEXT and then select the account you want to affect. Click CHANGE
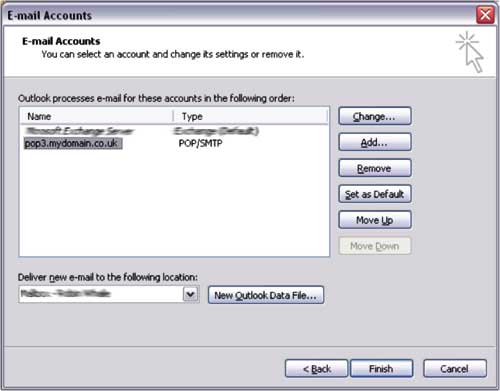
In the next window you are back to the settings page. Click on MORE SETTINGS.
Select the ADVANCED tab. This is where you can change the smtp port from 25 to 25025 if you can't send emails.
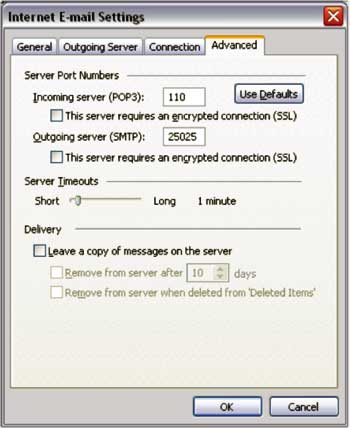
After making any changes click OK and exit the Email Accounts section.
In the TOOLS menu select EMAIL ACCOUNTS and then ADD NEW ACCOUNT.

Click NEXT and select POP3 from the new window.

Click NEXT and then enter your POP3 and SMTP settings.

Click MORE SETTINGS and then the OUTGOING SERVER tab.
Select the authentication settings as below.

Click OK and then FINISH.

If you need to change any settings go to TOOLS/EMAIL ACCOUNTS again and select VIEW OR CHANGE.

Click NEXT and then select the account you want to affect. Click CHANGE

In the next window you are back to the settings page. Click on MORE SETTINGS.

Select the ADVANCED tab. This is where you can change the smtp port from 25 to 25025 if you can't send emails.

After making any changes click OK and exit the Email Accounts section.
Thunderbird
Different versions of Mozilla Thunderbird have slightly different set ups. This should give you a pretty good idea of where to go and what to do though.
Go to Tools > Account Settings.
Click Add Account and select Standard. If you want Thunderbird to handle all your emails then select Use Thunderbird as my default mail application.
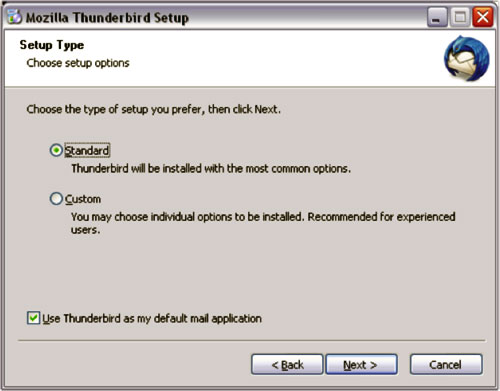
Click Next.
If you already have another email account you may want to import your settings for your address book etc., but if it is a new account then click on Don't import anything.
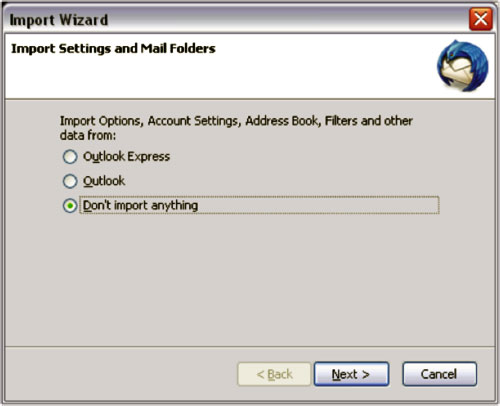
Click Next.
Enter your name, as you want it to appear in any messages you send and then enter your email address and password.
Unless you are on a shared computer (and are very good at remembering your passwords) click on Remember password.
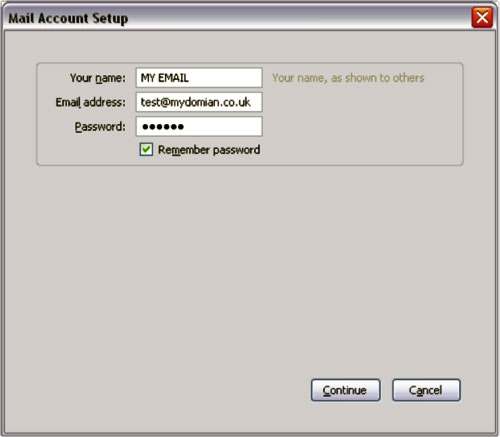
Click Continue.
Thunderbird will do a quick check to see if your settings are right, but the test will fail as we are not using the same settings as its deafaults.
Don't worry, this is normal.
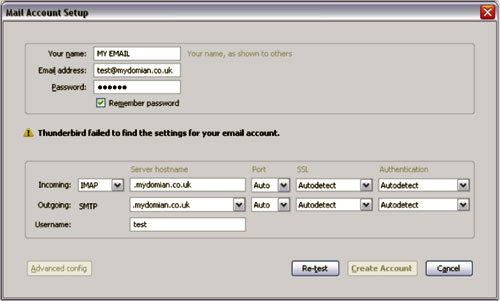
In the lower part of the window select the POP3 option from the Incoming pull down menu.
The settings for the ports should change from Auto to 110 and 25 respectively.
Make sure that SSL is set to NONE.
Change the Authentication settings for both incoming and outgoing mail to Normal password.
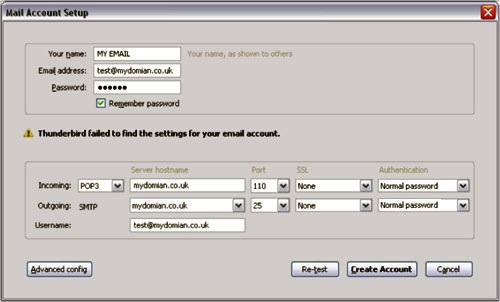
Click Create account.
If you need to change any settings (for example) go to Tools > Account Settings and all the information will be there.
This is a useful place to set how often you check for new messages and how long you want downloaded messages left on the server.
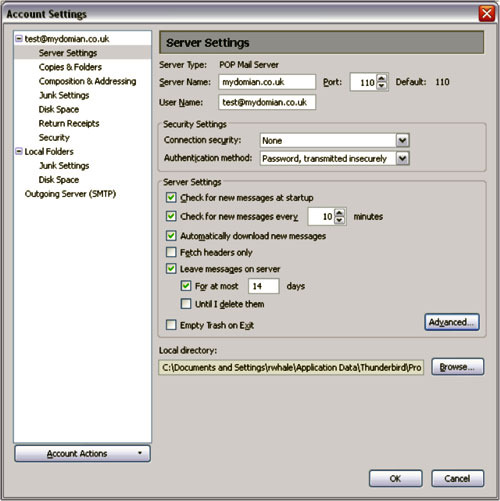
To change the outgoing email port from 25 to 25025 if you find you have problems sending emails go to Tools > Account Settings and click on Outgoing Server (SMTP) and change the port number there.
Go to Tools > Account Settings.
Click Add Account and select Standard. If you want Thunderbird to handle all your emails then select Use Thunderbird as my default mail application.

Click Next.
If you already have another email account you may want to import your settings for your address book etc., but if it is a new account then click on Don't import anything.

Click Next.
Enter your name, as you want it to appear in any messages you send and then enter your email address and password.
Unless you are on a shared computer (and are very good at remembering your passwords) click on Remember password.

Click Continue.
Thunderbird will do a quick check to see if your settings are right, but the test will fail as we are not using the same settings as its deafaults.
Don't worry, this is normal.

In the lower part of the window select the POP3 option from the Incoming pull down menu.
The settings for the ports should change from Auto to 110 and 25 respectively.
Make sure that SSL is set to NONE.
Change the Authentication settings for both incoming and outgoing mail to Normal password.

Click Create account.
If you need to change any settings (for example) go to Tools > Account Settings and all the information will be there.
This is a useful place to set how often you check for new messages and how long you want downloaded messages left on the server.

To change the outgoing email port from 25 to 25025 if you find you have problems sending emails go to Tools > Account Settings and click on Outgoing Server (SMTP) and change the port number there.
Mail (Apple Mac)
Different versions of Mail have slightly different set ups. This should give you a pretty good idea of where to go and what to do though.
Open Apple Mail.If you run it for the first time and do not have any mail accounts configured Apple Mail will take you directly to the Add Account section.
If you do have accounts already set up then in the MAIL menu at the top left of your screen select Preferences (or press CMD-,), click on Accounts and then click the "+" sign at the bottom left of the screen.
Enter your name, as you want it to appear in any messages you send, your email address and password.
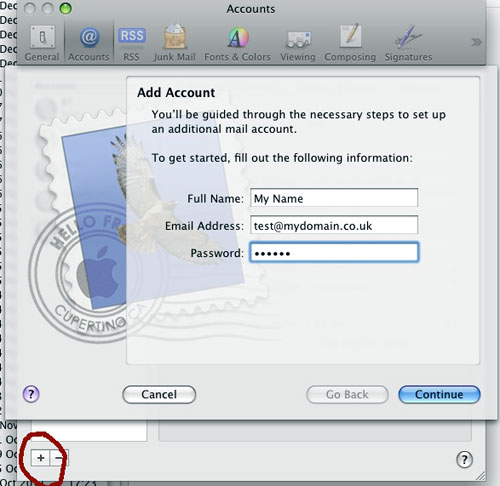
Click Continue.
Select POP as your account type and put in a description for the account (so you can differentiate it from any other emaIL accounts).
Enter the Incoming Mail Server settings, your User Name (its the same as your email address) and your Password.
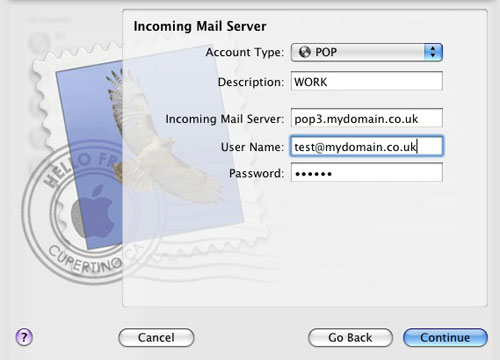
Click Continue.
Mail will attempt to test your connection for incoming mail.

If it cannot connect to the server it will tell you.
The most common cause for this failure is that you have entered your password details incorrectly.
Remember - passwords are case sensitive so a "b" is different from a "B". Also it is easy to mix up a zero and the letter "o".

Click Continue.
Do not click the SSL button. the Authentication should be Password.
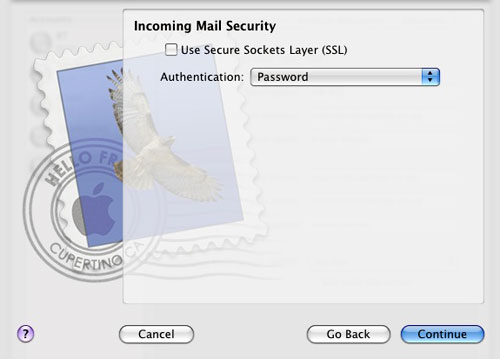
Click Continue.
Re-enter your Description, the Outgoing Mail Server settings and click on Use only this server.
Select Use Authentication and re-enter your User Name and Password.
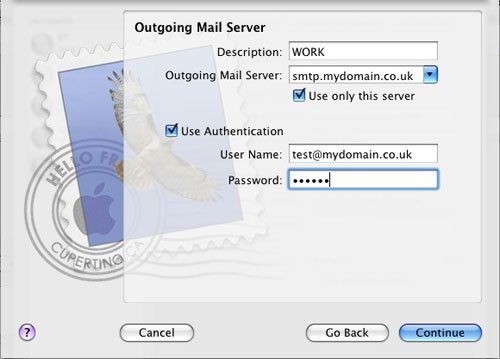
Click Continue.
Mail will, again, try to connect to check your settings.
As above, a failure to connect is probably due to a typing error with the password.
As with the Outgoing Mail, don't select SSL and use Password.
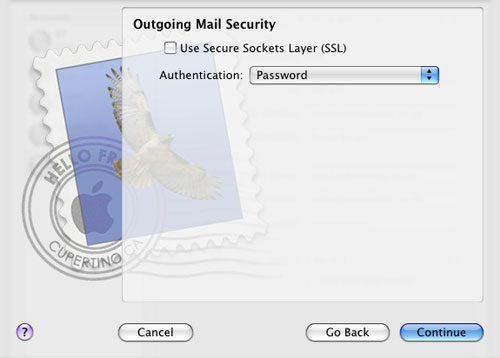
Click Continue.
Check your settings and make sure the Take account online is selected.
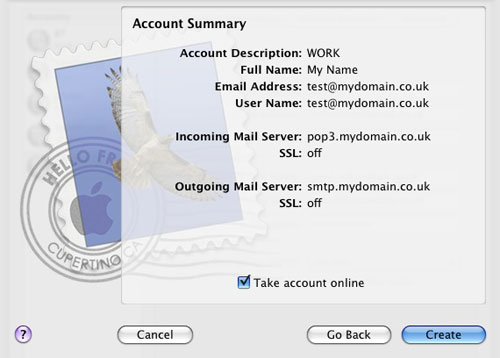
Click Create.
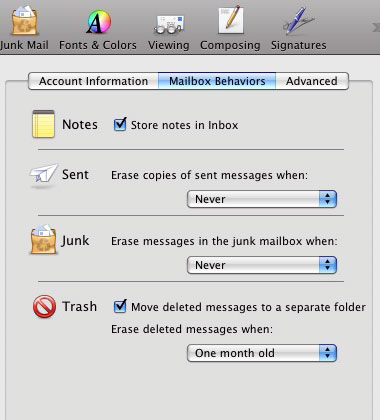
When you return to main Accounts section click on the Mailbox Behaviours tab and make whatever changes you wish.
If you don't want to make any changes now these can easily be changed at a later date.
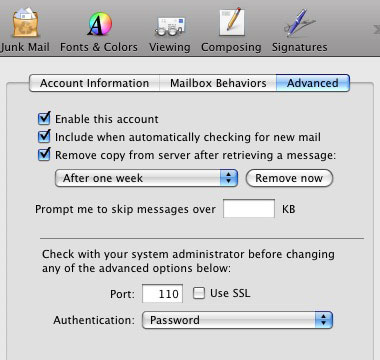
Click on the Advanced tab to make further changes as you wish.
Make sure Enable this account is ticked.
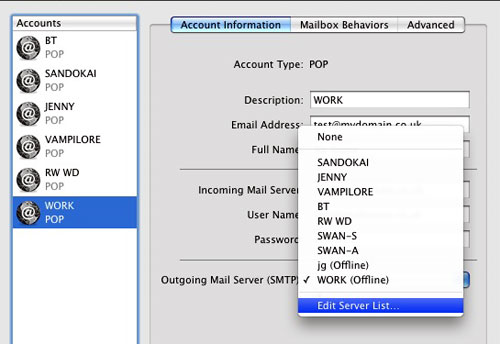
If you have problems sending emails it may be because your ISP is blocking smtp port 25.
Go to the Accounts section of Mail's Preferences, click on the account name to select it, and then click on the Outgoing Mail Server (SMTP) drop down menu.
Choose Edit Server List.
The default view of the new window is Account Information. Click on the Advanced tab.
Click on the Use custom port and enter 25025.
Re-enter your password at the bottom of the screen.
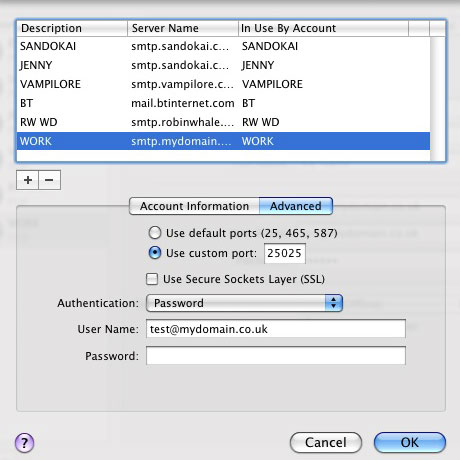
After making your changes click OK and exit Preferences.
Open Apple Mail.If you run it for the first time and do not have any mail accounts configured Apple Mail will take you directly to the Add Account section.
If you do have accounts already set up then in the MAIL menu at the top left of your screen select Preferences (or press CMD-,), click on Accounts and then click the "+" sign at the bottom left of the screen.
Enter your name, as you want it to appear in any messages you send, your email address and password.

Click Continue.
Select POP as your account type and put in a description for the account (so you can differentiate it from any other emaIL accounts).
Enter the Incoming Mail Server settings, your User Name (its the same as your email address) and your Password.

Click Continue.
Mail will attempt to test your connection for incoming mail.

If it cannot connect to the server it will tell you.
The most common cause for this failure is that you have entered your password details incorrectly.
Remember - passwords are case sensitive so a "b" is different from a "B". Also it is easy to mix up a zero and the letter "o".

Click Continue.
Do not click the SSL button. the Authentication should be Password.

Click Continue.
Re-enter your Description, the Outgoing Mail Server settings and click on Use only this server.
Select Use Authentication and re-enter your User Name and Password.

Click Continue.
Mail will, again, try to connect to check your settings.
As above, a failure to connect is probably due to a typing error with the password.
As with the Outgoing Mail, don't select SSL and use Password.

Click Continue.
Check your settings and make sure the Take account online is selected.

Click Create.
When you return to main Accounts section click on the Mailbox Behaviours tab and make whatever changes you wish.
If you don't want to make any changes now these can easily be changed at a later date.

Click on the Advanced tab to make further changes as you wish.
Make sure Enable this account is ticked.

If you have problems sending emails it may be because your ISP is blocking smtp port 25.
Go to the Accounts section of Mail's Preferences, click on the account name to select it, and then click on the Outgoing Mail Server (SMTP) drop down menu.
Choose Edit Server List.

The default view of the new window is Account Information. Click on the Advanced tab.
Click on the Use custom port and enter 25025.
Re-enter your password at the bottom of the screen.

After making your changes click OK and exit Preferences.
Many people use google, yahoo, msn and hotmail accounts for their email. These accounts are free to anyone who wants them and often carry adverts for that service. They can also result in a lot of spurious and dubious emails from less than savoury persons who get a free account and then send out millions of emails a day promoting dating and gambling sites, selling various chemical and mechanical "enhancements" for your love life, or trying to get hold of your financial details via fake lottery wins, warnings of account suspensions or offers of sharing the proceeds of millions of $ of unclaimed inheritances.
If a lawyer from a reputable sounding firm asks you to help him smuggle large amounts of money out of Nigeria (for a nominal processing fee) check that persons email. If it is from lawyerwilliam123@hotmail.com the odds are that is a fake or phishing email.
If you have a reputable company (or are a reputable person) with your own domain then why do you need to use someone else's email system. Either you are too lazy to set up your own email or you aren't quite what you profess to be.
If I get an email with the latest and best deals from www.tastycatfood.com no matter how tempted I am by the prices of their tins of Pussy-yums Deluxe if the email came from a Hotmail, Yahoo or Google account it gets deleted.
I hate spam, phishing and spoof emails. They clutter up the internet and waste my time deleting them.
To learn more about some of the many scams, fake emails and dodgy web sites that are floating around the internet waiting to catch out the unwary take a look at the Hoax-Slayer web site.
In an attempt to restrict the amount of spam your internet service provider (ISP) may decide that they won't let you send out any emails using their service.
Strangely, they don't always do this. You may never have a problem, or one day out of the blue you find that you can't send any emails.
You can still receive emails with no problem but you cannot send them.
What the ISP has done is put a block on Port 25, the standard port for sending emails.
If this happens to you and you are hosted with me then there is a very simple way to get round this.
Go to you account settings and find the smtp settings. Where it says Port 25 for sending emails, change the port number to 25025, save the settings and all will be fine again.